How-to: dump1090 + feeders
How I receive flight data, map it on my home network and contribute online
Setting up a non-branded dump1090 ADS-B receiving station running independently of the flight data sites then fed the data to four main services: FlightRadar24, Planefinder, FlightAware & AirNav RadarBox
Steps
- Buy parts
- or buy some and make some – especially the antenna
- Install OS & configure basic setup
- Install dump1090 & configure basic setup
- Create web accounts with flight data services
- Install and configure feeders
- Get fit by continually running outside to see if the planes you see on the screen are the planes you see in the air, and even fitter if you plan to incrementally develop your antenna and mount it in the loft!
Jump down to the instructions to see what I did in each step, or read a bit more about my setup.
Introduction
I’m a tinkerer. Especially with home-grown electronics. Especially with home-grown electronics that interface with real things, really happening in the real world. Until about a month ago I had no idea the following was available to anyone other than, perhaps, airports and airlines. My usual projects are about home automation – sensing things and making usually-manual things happen automatically (usually based somehow on the sensed things).
This caught my eye when I stumbled on https://www.flightradar24.com/apply-for-receiver and then thought “that has to be buildable (maybe even if only to a lower performance)” and then found https://www.flightradar24.com/build-your-own and lots of other on-line activity related to Google ADS-B DIY.
I also have to say, at this stage, that most of this is not my own work – this has been one project that’s been easy to get up-and-running without really understanding why. There hasn’t been much troubleshooting or working out what certain articles are really trying to say – I’ve just written this to get it all in one place and, to be fair, because I started writing it down for a friend and thought it’d be better shared online.
My first steps were with a DVB-T tuner from an online auction site. It just didn’t work and I’ve since found evidence in forums that not all DVB-T tuners are equal. From that point I bought a FlightStick Pro Plus and bodged the DVB-T antenna to fit the FlightStick Pro Plus to prove the software and setup, but then moved on to antennas that perform with a bit more exciting results.
I’m now working on understanding antenna design in better detail and I have two stations running – side-by-side – so as to compare antennas, and especially minor changes to an antenna. The two are basically identical and I change one thing then run them for a week – the winner stays, the loser is modified to match the winner then another modification is made to just one of them and another week’s testing goes by.
My antenna discoveries so far
Instructions
So…the steps in more detail…
1. Buy parts
- Raspberry Pi – I’m using a Pi 4 with 2GB of RAM (like this)
- An SD card – I’m using a 16GB micro SD (like this)
- A USB tuner – I’m using a FlightAware Pro Stick Plus (like this)
- A suitable power supply – USB phone charger with sufficient power to run the Pi and power the stick. I haven’t had any trouble with the one from my Galaxy S9 but I’ve read elsewhere that an underpowered supply causes issues
- An antenna suitable for receiving 1090MHz transmissions with a connector appropriate for the stick – I’m using a home-made one (like this) but believe this (with a cable) to be an appropriate starting point if the DIY route doesn’t provide suitably instant gratification (it’s worth it, trust me) – you’ll also need a soldering iron and a few simple tools like wire clippers and a craft knife if you plan to DIY
At the time of writing (summer 2020) the above would have cost me about £70 in total if I hadn’t already got a Pi, SD card, PSU and some coax. The USB tuner was £23 and I re-purposed everything else until I’d proved it was worth buying to replace.
2. Install OS and configure basic setup
This is a topic worthy of an article that applies to a wider audience so I’ve written it separately – drop this entire article in here if you need these instructions
3. Install dump1090 & configure basic setup
dump1090 is the software that will take the incoming data from the USB receiver and make it useful. Importantly for me it does three things – decodes it (turns it from raw messages into useful information), draws a map, and provides the data in a useable format for other software on the network.
I like to start by getting everything ready in advance. You’ll need:
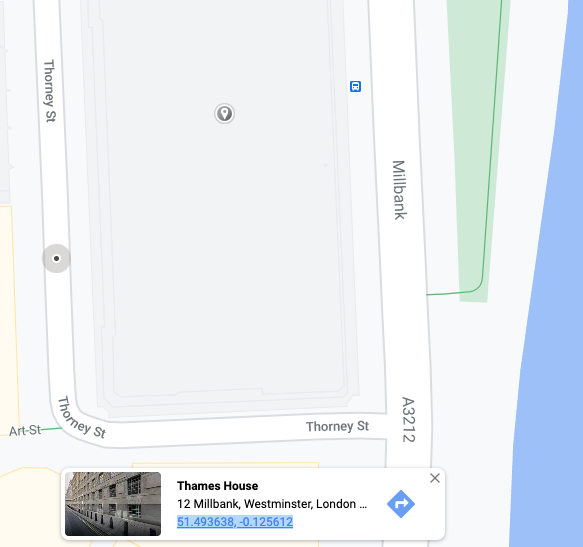
- Your antenna’s latitude and longitude in decimal degrees – get them by visiting Google Maps, dropping a pin and copying the co-ordinates from the pop-up box
- Your antenna’s height above sea level (elevation) – get that by searching online for “elevation by co-ordinates” and use one of the many tools available (eg this one). Enter the co-ordinates you obtained above to find the ground-level elevation. Add the height above the ground of your antenna.
- Your Raspberry Pi’s IP address, username and password – only you know these and would probably have first obtained them when installing and configuring Raspbian on your Pi originally.
SSH in to your Raspberry Pi:
ssh <ipaddress> -l <username>Then ensure everything is up-to-date on the Raspberry Pi’s OS:
sudo apt update
sudo apt upgrade
sudo apt full-upgrade
Next run a script to install the dump1090 package and auto-start the configuration tool:
sudo bash -c "$(wget -O - https://raw.githubusercontent.com/abcd567a/dump1090/master/install_dump1090_mut_1.15.sh)"Once this has completed you’ll get a blue screen with a basic dialog box in the centre. Select “yes” and allow the installation to continue and then answer the questions as follows:
- Username – accept the default “dump1090”
- Logging path – accept the default
- RTL-SDR dongle – enter “0” (zero) and press ENTER
- Gain – accept the default “max”
- Frequency correction – accept the default “0” (zero)
- Absolute max range – accept the default (or override if you are experimenting and know what this means)
- Latitude – enter your latitude from your Google Maps work above
- Longitude – enter your longitude from your Google Maps work above
- Ports (5, or so, screens) – accept all the defaults
- Default heartbeat – accept the default “60”
- Message size – accept the default “500”
- Buffering time and size – accept the defaults
- Interfaces to bind to – remove the entry and leave this blank, press ENTER
- Intervals for logging stats and writing JSON state – accept the defaults
- Receiver location accuracy – select “exact”
- JSON file path – accept the default
- Extra arguments – do not provide any, press ENTER
Next allow the services to restart (which they’ll do automatically if all has gone to plan)
Wait for a few seconds and then type
sudo rebootYour Pi OS will reboot and log you out. Once you are able to get a response at the command line log in again with the usual SSH command, as above.
Your dump1090 installation should now be running and, as long as you have a working installation, suitable antenna and at least one aircraft within range providing sufficient information in ADS-B messages, you’ll see a satisfying map here:
http://<ipaddress>/dump1090/gmap.html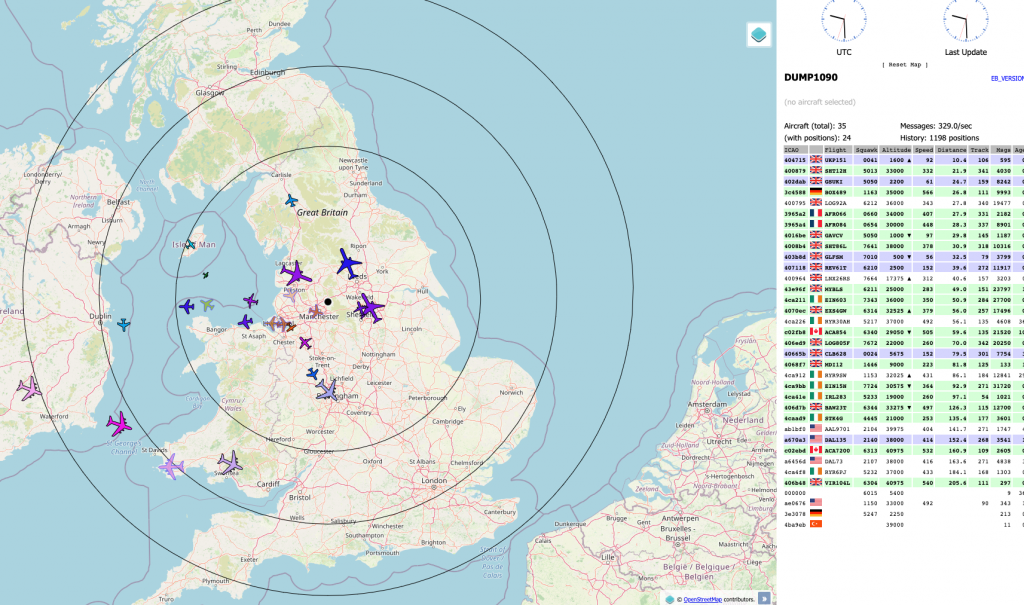
Your installation should also now be making the data used to create the map available over the network. It will also be presenting it in JSON format, updated every second (assuming you accepted the defaults above) at:
http://<ipaddress>/dump1090/data/aircraft.json4. Create web accounts with flight data services
In the next step you will need to point your feeders at accounts with their respective services so its probably easier to create all of those in advance and note down the associated info.
If you plan to feed data to as many as possible I’d go for:
- Flightradar24
- FlightAware
- Planefinder, and
- AirNav RadarBox
Flightradar24: create an account here and remember the email address (and password) used to do so
FlightAware: create an account here and make a note of the email address and password
Planefinder: go to planefinder.net and click “Sign in”. On the next screen choose “New to Plane Finder? Create account” and make note of the details you provide
AirNav RadarBox: create an account here and make a note of your entries
5. Install and configure feeders
Again, before starting, have the following ready:
- Your antenna’s co-ordinates and elevation from section 3 above
- Your Raspberry Pi’s ip address, username and password from section 3 above
- The email addresses for your flight service accounts from section 4 above
Starting with Flightradar24, log in to your Raspberry Pi using the usual SSH command as above. Then type the following to run the fr24 installation and configuration process:
sudo bash -c "$(wget -O - http://repo.feed.flightradar24.com/install_fr24_rpi.sh)"Once it completes it will automatically start a configuration tool. Answer the tools text-based questions as follows:
Q1 – enter your flightradar24 email address for the account created above
Q2 – leave the sharing key blank and press ENTER
Q3 – answer “yes” to the MLAT question (at least, on a Raspberry Pi 3 or later – MLAT requires a bit more processing power than earlier models can provide) and complete the latitude, longitude and height with your info from earlier. Then confirm that you want to continue with the settings you’ve created.
Q4.1 – select option 4 (ModeS Beast)
Q4.2 – select option 1 (Network connection)
Q4.3A – enter “127.0.0.1” (without the quotes) for the receiver IP address. Search for “localhost loopback address” if you are wondering why this isn’t the IP address of your Raspberry Pi
Q4.3B – enter “30005” (no quotes) for the receiver port number
Q5.1 – RAW: “no”
Q5.2 – Basestation: “no”
Q6 – disable logs, select option 0
That completes the configuration of the fr24 feeder on your Raspberry Pi. The service should now be running and you can confirm that by ensuring there’s a live page at:
http://<ipaddress>:8754Assuming all has gone to plan and you have a working internet connection your feeder should now be providing data to the flightradar24 service. In order to see the data and statistics related to it you’ll need to associate this unique feeder with your account, so click here to access the page on flightradar24.com – you may need to log in again with the email address and password you saved from section 4 above, and click “Activate”.
Once the process has completed (fairly instant) you should be able to visit this page to see your statistics.
Next, install FlightAware‘s feeder, as follows:
wget https://uk.flightaware.com/adsb/piaware/files/packages/pool/piaware/p/piaware-support/piaware-repository_4.0_all.deb
sudo dpkg -i piaware-repository_4.0_all.deb
Note that new packages may be available since the time of writing. You can check that here
Next execute each of the following commands:
sudo apt update
sudo apt install piaware
sudo piaware-config allow-auto-updates yes
sudo piaware-config allow-manual-updates yes
FlightAware’s feeder (“piaware”) should now be configured and running. The default configuration is for a feeder taking its data from a local installation providing ModeS Beast data over a network connection so no manual configuration changes are required.
To complete the configuration within the FlightAware service click here. If your feeder is not shown, wait 5 minutes and try again.
Once your feeder is successfully supplying data you will be able to see your personal statistics using the link on the page showing a successfully claimed feeder “you can view your statistics here”.
There is no local resource showing any output of the FlightAware feeder on your local network – only on the FlightAware website.
To install the Planefinder feeder, back on your Raspberry Pi execute the following commands:
wget http://client.planefinder.net/pfclient_4.1.1_armhf.deb
sudo dpkg -i pfclient_4.1.1_armhf.deb
Then to launch the configuration tool in a browser go to:
http://<ipaddress>:30053/setup.htmlComplete your email address and antenna co-ordinates then click “Create new sharecode”. On the next screen enter “127.0.0.1” for the IP address and “30005” for the port. Click “complete configuration” then go to:
http://<ipaddress>:30053/map.htmlYou can also see your statistics online at:
https://planefinder.net/account/receivers
Finally, you may also want to contribute to AirNav RadarBox. To do that execute the following command in an SSH session on your Raspberry Pi:
sudo bash -c "$(wget -O - http://apt.rb24.com/inst_rbfeeder.sh)"Just before the script completes it will ask whether you wish to install dump-978. You do not need to do that outside of the USA.
Next, execute the following command:
sudo rbfeeder --set-network-mode on --set-network-host 127.0.0.1 --set-network-port 30005 --set-network-protocol beast --no-start
sudo apt-get install mlat-client -y
sudo systemctl restart rbfeeder
sudo rbfeeder --showkey --no-start
Once your key has been displayed, copy it onto your clipboard and click here. Then paste your key into “Sharing key” field, and click “Claim!”
You should then be able to see your data and stats by clicking here and choosing “Account” and “Stations”.
2 Replies to “How-to: dump1090 + feeders”